
Today we will be talking about zeroing your new red dot sight. This article is totally newbie friendly so don’t worry if it’s your first time with firearms, first red dot sight or if you’re new to zeroing.
Red dots are becoming way more popular than they were before. Every gun owner owns a red dot, be it for a handgun, shotgun or lever-action rifles. Using them is an amazing experience but mounting and zeroing them can be a pain.
So, let’s jump to the topic.
What is the Best Distance to Zero a Red Dot?
It’s totally a personal preference, some shooters are comfortable at 100 yards and others at 50 or even 25 yards. You can try at all distances and choose whatever suits you the best.
I personally prefer zeroing a red dot at 50 yards as it automatically gets zeroed at 200 yards.

To prevent any mechanical offset you can zero your red dot at 25 yards.
Mechanical offset is the spatial difference between the optic and the center line of the barrel.
All in all, the method is same regardless the distance you aim at.
Before we move Forward…
The Best Way To Zero a Red Dot
Though there are various kinds of bore sighting equipment but I prefer Magnetic Bore Sighter from Wheeler.
You can get Wheeler laser bore sighter from Amazon and the reviews are as expected.
What i really like about it is that it’s compatible with any caliber rifle/handgun as long as the muzzle is ferrous.
You can see the green light (also available in red) well up to a 100 yards and it’s dead on!
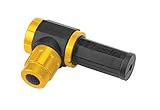
- SPECS: Class IIIR with power output of less than 5mW
- EASE OF USE: Magnetic connection quickly and easily attaches to the muzzle of the gun and can be...
- RELIABLE: Laser module permanently secured for dependable performance and hand-tuned during...
Last update on 2024-04-25
Why Prefer AR Platforms to Zero a Red Dot?
All AR platforms have the same Picatinny rail, so that’s an added benefit for easy mounting.
Also, you mostly get mounts with red dots which perfectly fit on the Picatinny rails.
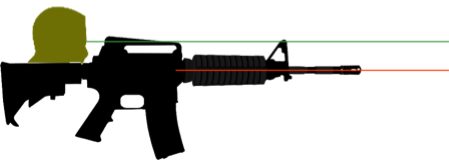
Furthermore, if you’ve accessories like iron sights (BUIS), or lights taking space on the rail you can still mount the red dot either close to the eye or close to the muzzle. Thanks to the infinite eye relief the red dots provide.
In case you don’t have access to an AR platform, don’t worry the method is still the same.
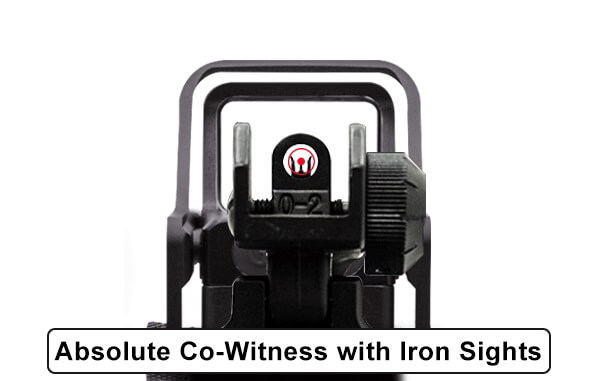
How to Zero a Red Dot with Iron Sights?
Iron sights make the whole process a lot easier.
All you’ve to do is perform what the soldiers call as “lollipopping”.
Lollipopping is the process of placing the dot on the top of the front post. You’ll have to play a bit with those windage and elevation adjustments to achieve lollipopping.
Go to the range and perform a test, the point of impact will be somewhere near the target.
If you’re looking for more precision, simply adjust to get the desired point of impact.
How to Zero a Red Dot without Iron Sights?
Don’t worry, I got you. To zero a red dot without an iron sight is to boresight.
To be honest, every gun owner should own a bore sighter.
The main advantage of bore sighting a red dot is, it saves ammo, is time-saving and is cheap.
What’s the Best Bore Sighter in 2022?
Though there are various kinds of bore sighting equipment but I prefer Magnetic Bore Sighter from Wheeler.
You can get Wheeler laser bore sighter from Amazon and the reviews are as expected.
What i really like about it is that it’s compatible with any caliber rifle/handgun as long as the muzzle is ferrous.
You can see the green light (also available in red) well up to a 100 yards and it’s dead on!
And here’s a quick review in case you’re interested:
Zeroing a Red Dot Using Laser Bore Sighter:
Laser Bore Sighters are a great option to get the bullet on the paper and it can bring you closer to the target.
All you have to do is insert the laser bore sight into the bore and aim at the target. The laser dot will help you to zero the red dot easily and without any shooting.
Old School Way of Bore Sighting:
Now, still considering the AR platform, place the upper (after removing the lower) on a steady platform like a gun vise.
Now let’s say you’re aiming at 50 yards, try to bring the barrel at the center of the target.
Once adjusted, look through the sight and adjust the placement of dot so that it’s at the center of the target.
Double check the barrel placement, if it moved while adjusting the red dot, you’ll have to repeat the steps again.
Fire some groups to check the point of impact and adjust if needed.
Zeroing a Red Dot on a Handgun/Pistol:
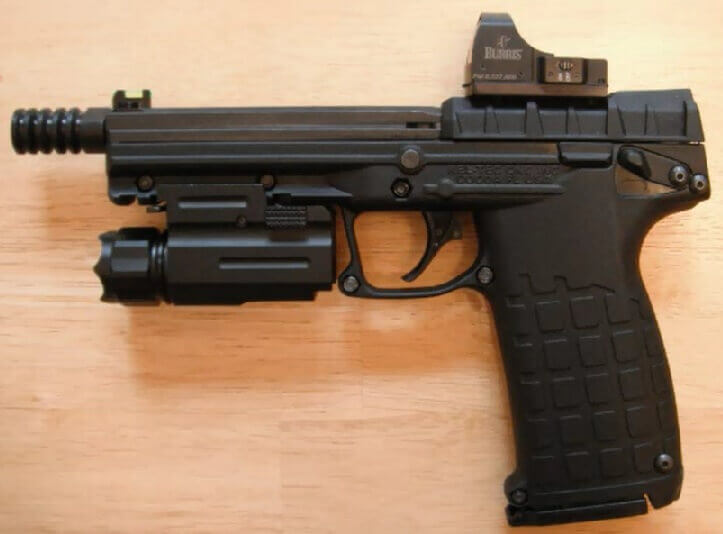
The advantage of modern handguns is that they are already equipped with mounting features.
In case your pistol doesn’t have this feature you’ve got 2 options:
- Either try to mount it using dovetail shot.
- Or simply a certified gunsmith can add a mounting platform for the optic.
Now, place the dot on the top of the iron sight by adjusting it (Lollipopping).
Aim at the target (preferably at 5 yards) and check the point of impact and make the adjustments accordingly.
For zeroing the gun at other distances (say 20 yards), you’ll have to probably make slight elevation adjustments.
Fire a few groups and check the point of impact. Repeat until you hit the desired point.
Making Adjustments on the Optic to Achieve Zero:
Before we dive into this, let’s talk about MOA (minute of angle).
What is MOA?
Simply, MOA is unit of measurement, let’s understand with an example.
When we say 1 MOA, we mean 1 inch at 100 yards. Also, 1 MOA is a ½ inch at 50 yards.
To understand the whole concept of adjustment in a much better way I suggest to watch this video, practical info is better than theory.
If you still want to read then go on.
So, if we place a grid square at 100 yards and shoot at it, regardless of where it hits in the square, your minute of adjustment will be the MOA.
Now, let’s have a look at the sight. On the red dot sight, we get windage and elevation adjustments.
For the red dot, I am considering it has 1 MOA per click (check your manual to see yours). Generally, 1 MOA is too much, I know.
So, this means, if I shoot my rifle and I aim at the zero and when I fire the bullet, it lands here.
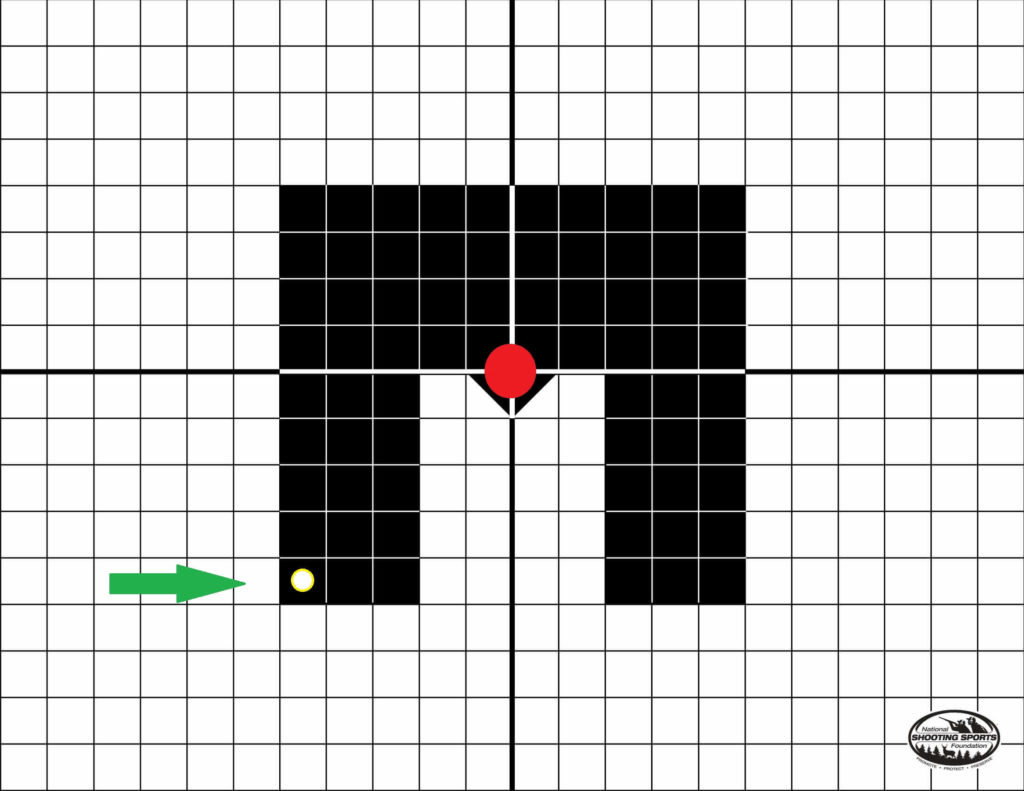
So how would I bring the point of impact to the point I am actually aiming at?
Ok, we know 1 MOA is a 1-inch adjustment at 100 yards. Now check your optic, you will see that it has got a “UP” and an arrow that indicates “Right”.
So, as I know my adjustments are 1-inch per click so as per the grid, I’ll go 6 clicks UP (use a screwdriver if needed).
So, the 6 clicks should bring the point of impact to the point as seen in the image below.
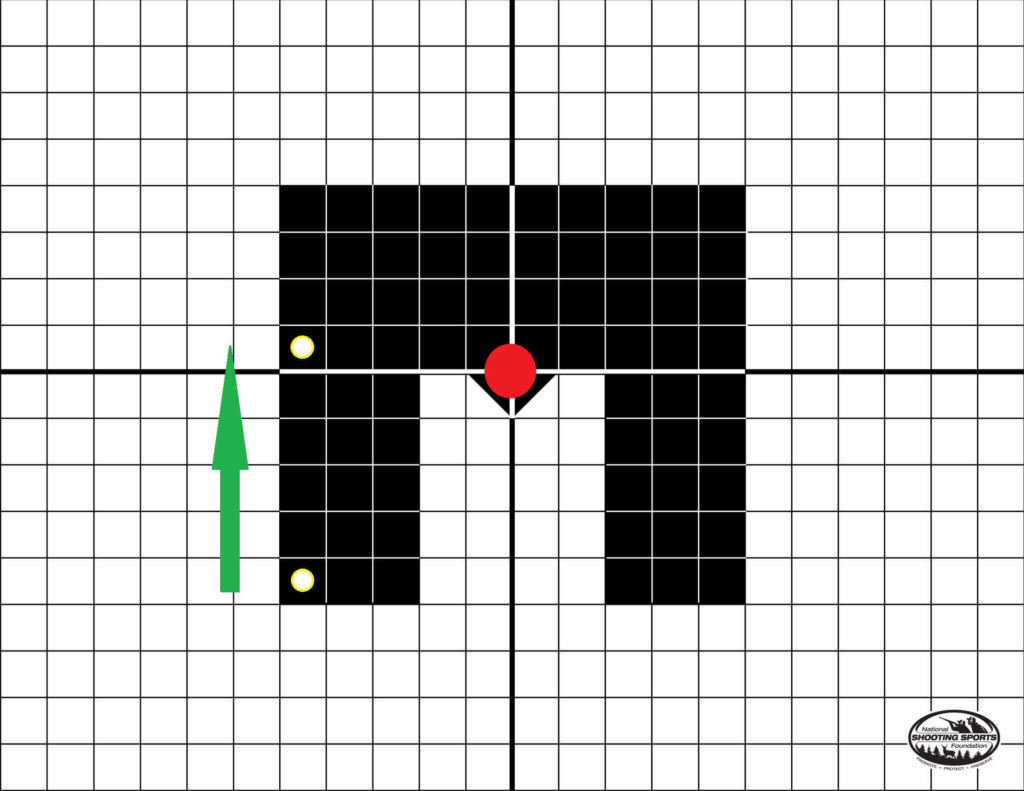
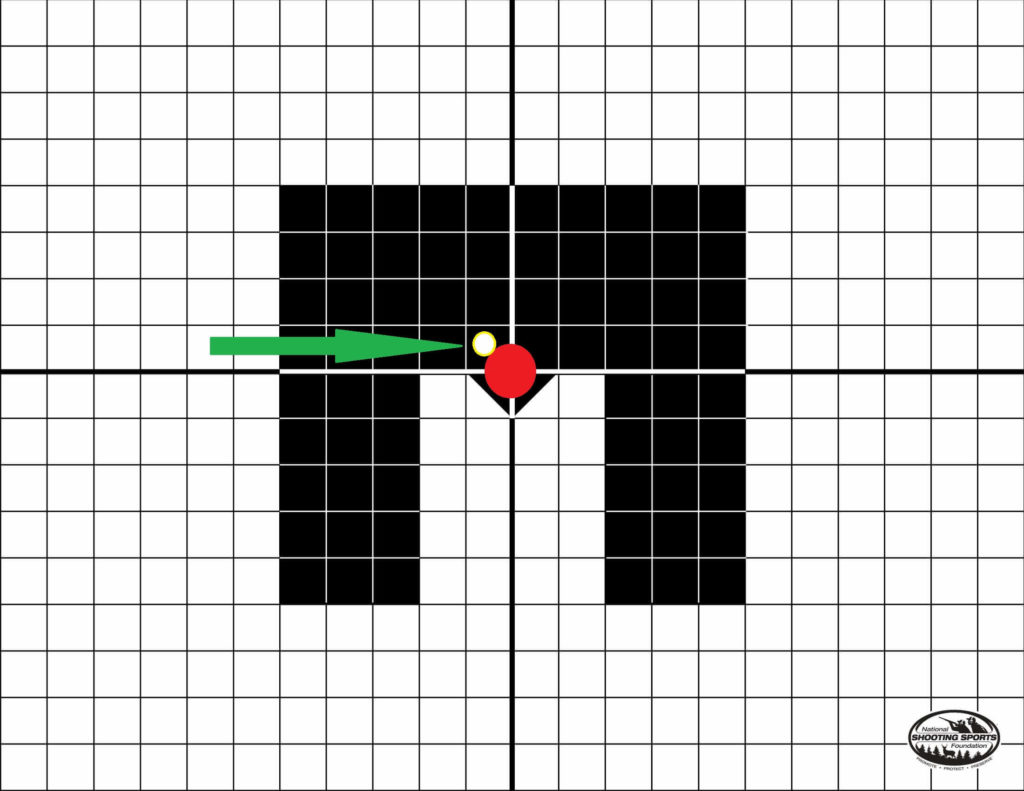
Now we need to bring the impact point to the right. Let’s get on the windage adjustment (in my case it needs to be turned left to put the impact point to the right). It will take approximately 5 clicks to reach somewhere near the target.
So, now shoot again and you’ll see either you hit the target, or you are damn close to it. Do some minor changes until you’re happy with the adjustments.
That means, 1 MOA = 1 inch (100 yards).
1 MOA =1/2 inch (50 yards).
1 MOA = ¼ inch (25 yards).
So, if you are trying to zero your red sight at 50 yards, you have to simply double that.
At 50 yards, if your point of impact is similar to the first square grid, each adjustment will be ½ inch, so if you want to go up to the point, you must double that i.e., 12 clicks and to go right to the point at 50 yards you will have to double that too (here 10 clicks).
Have a look at the video and you’ll get an idea.
Recap:
If your sight has ½ inch MOA adjustments, you will have to take 2 clicks to move 1 inch at 100 yards (Ah! Simple Mathematics!).
If you have 1 inch MOA adjustments, you will have to take 1 click to move 1 inch at 100 yards.
Another Method to Zero a Red Dot Sight:
Here’s a quick method to zero your red dot by firing at most 2 shots.
Firstly, make sure that your rifle stays steady so maybe fix it on bench rest or a vice.
Now, simply fire at the sight-in target using the red dot.
OR I prefer shooting with iron sight first, doesn’t take much time and works well for short distances.
Now, simply move your dot to the impact point and boom you have successfully zeroed your red dot sight easily!
So, I hope this would have helped you to quickly zero your red dot. The same methods are pretty similar to zeroing your scopes too. If you have any questions or suggestions, please do comment below. Share this guide with your friends and fellow gun enthusiasts too!
Remember, know your scope, your rifle and basic adjustments.
Image Credits:
Online Waffen MV
NSSF
By Rcreek1 [CC BY-SA 3.0]via Wikimedia Commons
Gun-Jutsu-Training
Is it necessary to have a front sight to co witness with the red dot ?
Hey Charlie,
No, they aren’t. But what you’d like instead is your RDS, rear and the front sight all lined up.